
I recently started a new project and needed to integrate Google Login. While there are several ways to implement this, I initially considered a simple deep link approach. However, I soon realized that relying solely on custom URL schemes is vulnerable to hacking. To ensure a more secure authentication flow, I decided to implement Google Login using PKCE(Proof Key of Code Exchange).
In this post, I’ll explain what PKCE is, why it is necessary, and how to implement it. Although PKCE is also applicable to Android, Android already has a robust native login system that uses SHA-1 fingerprints for verification, making it relatively safe from deep link vulnerabilities. Therefore, this article will focus specifically on the implement for iOS.
Why do we need PKCE?
The deep link login approach I initially considered is straightforward: it simply transfer the authrization code from the Google server to the app via deep link. To understand why this is risky, we first need to understand how deep links work.
What is Deep Link?
A Deep Link is essentially a URL for mobile apps. Just as a web URL takes you a specific page on website, a deep link can direct a user to a specific part of mobile application. Its primary role is to transfer control from mobile browser (where the login happnes) back to the app.
A typical deep link looks link this:
myapp://host/path?code=auth_code_hereThere are two primary ways to implment deep link:
Custom URL Schemes(e.g.,myapp://)- Universal Links (iOS) / App Links (Android)
The fundamental issue with Custom URL Schemes is the lack of ownership verfication. Unlike web domains (https://), which are unique and ownd by a specific entity, any developer can register any custom scheme for their app.
If two different apps-say, your legitimate apps and a malicious hacker app - register the same scheme (myapp://), the operating system cannot guarantee which app should be launched. This ‘hijacking’ risk is exactly why relying solely on a simple deep link to handle sensitive authorization code is dangerous.
The Isolated Environment of Native Apps and Browsers
Before diving deeper, we need to understand why deep link is necessary in the first place. As I mentioned earlier, the core function of a deep link is to hand over control from the browser to the app. The Google login process takes place entirely within a mobile browser. This is because, for security reasons, Google login requires authentication to happen in a secure browser environment rather than directly inside the app. However, there is a catch: native apps and browsers are completely isolated from each other. They do not share memory or state. The app has no way of knowing what is happening inside the browsers, and the same is true for the browser.
Therefore, once the browser receives authorization code from Google server, it needs a way to “send” that code back to the app. This is where the deep link comes in-it acts as a bridge, allowing the OS to manage handover of data and control from the browsers back to the native application.
Why Deep Link is Inherently Insecure
Based on the environment described above, we eventually have to transfer the authorization code via a deep link. However, as I mentioned earlier, Custom URL Schemes have no ownership verification. When a deep link is triggered, the OS simply looks for an app that matches the schemes and launches it.
But what if the malicious hacker app register the same scheme? The OS may inadvertently launch the hacker app and hand over the authorization code. This is critical security flaw known as an Auth Code Interception Attack.
The Attack Scenario:
- The browser receives the authorization code from the Google server
- The browser attempts to return to the app using a
deep link - The OS receives the
deep linkand searches for an app that registered with the scheme - If malicious app has registered the same scheme, the OS may give it both the control and sensitive authorization code.
Ultimately, relying solely on deep links for authentication is dangerous. While Universal Links(or App Links) offer better security by verifying app ownership at OS level, they are not perfect solution. Edge cases-such as system errors, users manually opening links in a browser, or logs in the browser history-can still expose the code. This is why we need a way to ensure that even if a code is stolen, it cannot be used by an attacker.
How PKCE Works
To solve this security flaws of deep links, we use the PKCE flow. This method introduces two key values to the authentication process.
Code Verifier: A high-entropy cryptographic random string generated by the app at runtimeCode Challenge: A result of hashing theCode Verifier(typically using SHA-256).
Because the Code Verifier is generated dynamically at runtime, it is significantly more secure than static secrets or environment variables, which can be leaked or hardcoded.
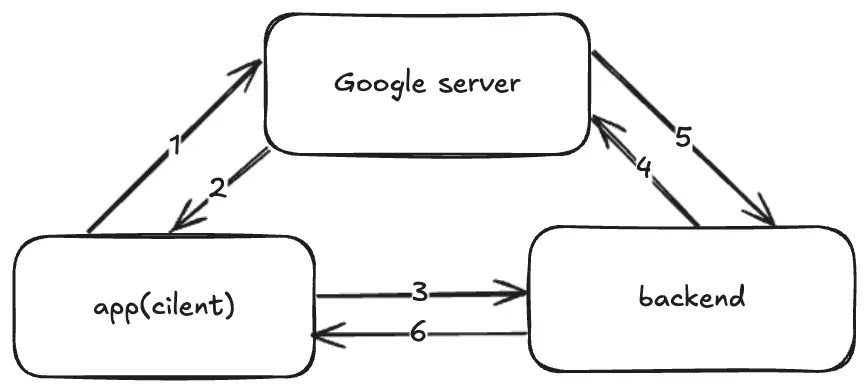
- The app generates a
Code Verifierand derives theCode Challengefrom it -
- When the app requests a Google login, it sends the
Code Challengeto the Google server
- When the app requests a Google login, it sends the
- Google saves this challenge and issues an authorization code as usual
- 2, 3. After the app receives the authorization code via a
deep link, it sends both the code and the originalCode Verifierto the backend server -
- Backend server request authorization from Google by providing the code and the
Code Verifier
- Backend server request authorization from Google by providing the code and the
- Google hashes the
Code Verifierreceived from the backend and compares it with theCode Challengeit stored earlier - 5, 6. if the values match, Google issues the user information to the backend, which then generates a JWT for the app
Why is this secure?
Even if a hacker intercepts the authorization code via a hijacked deep link, they cannot complete exchange. Since the hacker does not have the Code Verifier-which never left the legitimate app during the initial request-the stolen code is effectively useless to them.
Implementing PKCE in Expo iOS
To implement this flow, you first need to install the following dependencies:
$ npx expo install expo-web-browser expo-cryptoAdditionally, ensure you have generated a Google Client ID and iOS Client ID from the Google Cloud Console.
Step 1: Generating the Code Verifier
The Code Verifier is a cryptographically secure random string. We use expo-crypto to generate this value at runtime.
import * as Crypto from "expo-crypto";
// Helper function to ensure the string is Base64URL encoded (removing padding and special characters)const base64UrlEncode = (str: string) => { return str.replace(/\+/g, "-").replace(/\//g, "_").replace(/=+$/, "");};
export const generateCodeVerifier = async (): Promise<string> => { // Generate 32 random bytes (256 bits) const randomBytes = await Crypto.getRandomBytesAsync(32);
// Convert bytes to a Base64 string const base64String = btoa(String.fromCharCode(...randomBytes));
return base64UrlEncode(base64String);};Why 32 bytes? PKCE requires the code_verifier to have a minimum length of 43 characters. Since each Base64 character represents 6 bits, 32 bytes (256 bits) provide approximately 42.66 characters. After encoding and removing padding, this ensures we meet the security requirements while keeping the value high-entropy.
Step2: Deriving the Code Challenge
Next, we create the Code Challenge by hashing the Code Verifier using the SHA-256 algorithm.
export const generateCodeChallenge = async ( codeVerifier: string): Promise<string> => { const hashed = await Crypto.digestStringAsync( Crypto.CryptoDigestAlgorithm.SHA256, codeVerifier, { encoding: Crypto.CryptoEncoding.BASE64 } );
return base64UrlEncode(hashed);};This hashed value is what we need to send Google during the initial authorization request.
Step3: Requesting the Authorization Code
Now, we construct the Google OAuth URL. Unlike standard flows, we must include the code_challenge and code_challenge_method as S256
const authUrl = `https://accounts.google.com/o/oauth2/v2/auth` + `?client_id=${googleClientId}` + `&redirect_uri=${encodeURIComponent(redirectUri)}` + `&response_type=code` + `&scope=email%20profile` + `&code_challenge=${codeChallenge}` + `&code_challenge_method=S256`;redirect_uri: In iOS, this is typically the reversed Google Client ID (e.g.,com.googleusercontent.apps.XXX:/oauth2redirect).
Step4: Opening the Auth Session
Finally, we use expo-web-browser to open a secure browser session. This ensures the login can happen in a secure environment, and returns the authorization code to our app via deep link.
import * as WebBrowser from "expo-web-browser";
const result = await WebBrowser.openAuthSessionAsync(authUrl, redirectUri);Once the user completes the login, the result will contain authorization code, which your app can then send to your backend along with the original code_verifier for final validation.
Backend Exchange
While the focus for this post is the iOS implementation, the PKCE flow is only complete once the backend verifies the code. The backend receives the code and code_verifier from the app and exchanges them for an access token by making a POST request to Google’s token endpoint.
// Example: *Node.js* / *Express*app.post("/auth/google", async (req, res) => { const { code, code_verifier } = req.body;
const response = await axios.post("https://oauth2.googleapis.com/token", { code, code_verifier, // The magic happens here! client_id: process.env.GOOGLE_CLIENT_ID, client_secret: process.env.GOOGLE_CLIENT_SECRET, redirect_uri: process.env.REDIRECT_URI, grant_type: "authorization_code", });
const { id_token, access_token } = response.data; // Now, you can verify the id_token and issue your own *JWT*.});Conclusion
In this post, we have explored the implementation of PKCE login within the Expo iOS environment. We examined why transferring authorization code solely via deep links is structurally insecure and how the PKCE flow provides a robust solution to these vulnerabilities.
Please note that PKCE can be further enhanced by combining it with Universal Links to create an even more secure environment. I plan to cover this topic in a future post.